Inspired by Anthropologie's Secured Corsage Tee
Anthropologie price: $58
Designer on a Budget: $15
Savings: $43
Project time: 5-8 hours
Supplies - 1 Turqoise tee from Target ($9)
- Less than 1/4 yard of each (aprox $6)
- Turquoiseorganza
- White or cream organza
- Green jersey fabric
- Candle or Lighter
Tutorial
1. Cut out Circles
By taking a pencil or fabric marker free hand various circles. I focused on 3 different sizes; 1.5'' 3'' and 4'' diameter. I organized the circles by size and color so it was easy to assemble the flowers. Begin stacking circles in the desired pattern.
2. Curl the circles or "Petals"
To construct flowers to mimic Anthropologie's corsage I curled the petals with my candle. (instead of using a lighter I used a candle, that way you have both your hands free) To curl the circles with heat, hold the edges 2-3'' above the flame until the heat curls the edges.
Be careful not to burn yourself or light the fabric on fire. It took me a few tries, the first few I melted because I held it too close to the flame. Another tip is to ensure that all the sides curl in the same direction, this comes in handy during the next step.
3. Assemble Flowers
 To create the flowers stack the petals inside each other. Like I said earlier if the petals curl the same way they will now stack like little nesting bowls. Once the petals are all stacked, take a thread and make a X stitch. This way when you pull it taught it will gather the petals into a ruffled flower. Add as many stitches as necessary to get the look you desire.
4. Attach Flowers.
To attach the flowers separate petals and to hide your stitches under neath. I liked to place the stitches in a perimeter about an inch from the center. This held the flowers securely in place.Tip: When sewing together leave enough thread so that you can attach it to the shirt without threading your needle again.
5. Assemble Center of Corsage
 Continue to build the flowers and attach to shirt. I attached each flower as they were built so I could gauge how big to make the next one. This is what it will look like when the 4 flowers are attached.
 6. Ruffles
There are 2 sets of accompanying ruffles around the flowers. To create the ruffles I cut a strip of fabric 1-2'' wide and 10-12'' long. I then drew a wavy dashed line down the center, this acts as my guide when creating a gathering stitch. Making a wavy line will help create a more dynamic ruffle.Pin the ruffle in the desired position. I placed the pins down the center line (gathering). I then folded the ruffle in half and stitched on one side, this held the ruffle in my desired vertical position, instead of lying flat.
Tip: Start with the outermost ruffle and work inward. This helps you establish a perimeter to fill.
7. Thought I was done.
 There is one ruffle near the center V of the shirt and one smaller one on the right shoulder. Here is my completed shirt.
 However when I excitedly tried it on it wasn't the effect I was going for. The corsage was a little too large and consumed my right breast. So after some conference with a friend I moved one of the flowers and trimmed down the ruffles.
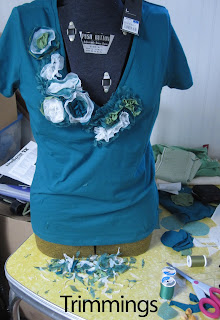
8. Trim
After moving the lowest flower to the upper right shoulder I took my scissors and trimmed EVERYTHING. I was careful to keep the look of the corsage with decreasing some of the volume. FINAL RESULT
Please feel free to leave questions and suggestions. Enjoy your new inspired by Anthropologie duds.
Not much for sewing, here is a link to the Anthropologie original


